skip to Main Content

Connecting Homes and Landscapes with Paths

Much of the beauty of our landscapes is created by the way in which each of the parts complement one another. This effect will be reinforced if there is a visual sense of connection between all of these elements, whether they are gardens, fountains, driveways, patios, decks, arbors, trellises or pools. We may encounter difficulties, however, if our houses or other structures fragment our yards into disparate parts. In these instances, we are left with areas that may be tasteful and pleasing to the eye individually but which seem to bear little relationship to each other.
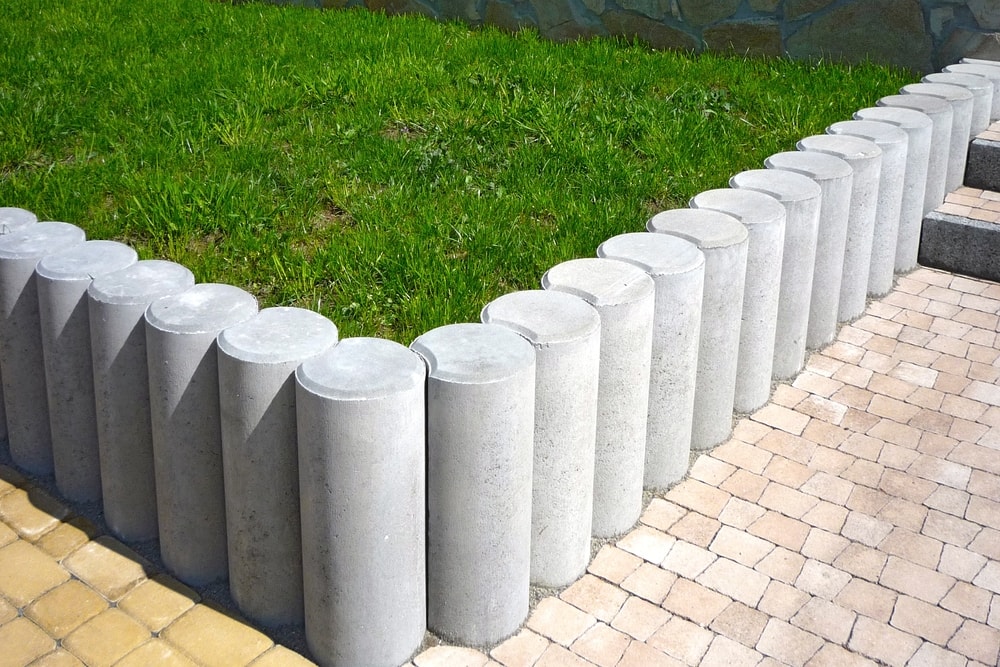
One of the easiest and most effective ways to visually connect various sites in a landscape is to use pathways. The cheapest materials we might use are wood chips, gravel and crushed stone (which are available in a range of sizes and colors), though if we have more time and energy to invest then we might consider brick, poured concrete or cut stone. Paving bricks are harder and more durable than wall bricks and should always be used outdoors. We also need to consider the rainfall. Gravel and cut stone drain well naturally; for other materials, we’ll want to create a grade of at least1/8 inch per foot so that rainwater doesn’t collect on our pathways. This we can do by either pitching our paths slightly to one side or building up a crown in their middles.

Finally, we’ll want to consider how well the materials we choose will blend with the style of our house and perhaps even the other structures lying on our landscape.

How wide we make our paths depends upon the primary uses we envision for them. We should allow at least 2 feet for walking, 3 feet for a lawnmower or wheelbarrow, and 5 feet or more if we desire a broad way where two can walk abreast. Generally, curving paths are more attractive than straight ones, especially if there seem to be reasons for their twists and turns. We can wind a path through a garden and then around a bend to reach a fountain or small plot of potted herbs. Paths can enclose groves of trees, creating an island-in-the-stream appearance. There are numerous other vistas that we might wind our way to, including pieces of sculpture, benches, archways, and trellises.

Paths give us an excuse to pause along our way and take in a view or admire an interesting floral design. We can also weave other effects, like enticing curiosity by curving a path out of our line of sight, or by slowly diminishing the width of a path to make a small grove look longer. Paths make for safe traveling for adults and children both. They help to keep our feet dry, and protect lawns and other areas from being trampled. Most of all, they make seemingly unrelated parts of our landscape feel like they belong together.

How To Get The Correct Kitchen Remodeling Software

How To Get The Correct Kitchen Remodeling Software

If you are thinking about remodeling your kitchen and want to see your ideas in some kind of shape, then use one of the many kitchen remodeling software available in the market. But there is a catch; most of them come with so many features that you may or may not need ultimately. So what are the things to look for in a kitchen remodeling software? 

How To Get The Correct Kitchen Remodeling Software 

If you are thinking about remodeling your kitchen with granite countertops and want to see your ideas in some kind of shape, then use one of the many kitchen remodeling software available in the market.

But there is a catch; most of them come with so many features that you may or may not need ultimately. So what are the things to look for in a kitchen remodeling software? Here is an overview:

o If you are looking to just kind of draw and see how your kitchen may look like with a change of color o a kitchen table top, then go for software like FloorPlanner or Plan 3D Viewer. This software do not have any technical aspects; you can just create a 2D or a 3D image of your room and then use different tabs to change the color and other aspects and see how your remodeled kitchen will look like. There are free versions but thy will not have all the features. Some may allow you to save the work in 2D while others will allow you take a print only.

o If you are looking for something more, then go for the software that will give you a 3D model of your kitchen along with estimation and material costs. In this case, the software from homedesignersoftware will be of great use. The software for kitchen remodeling not only allows you to see how the changes will look if you change, color of the walls, material of the kitchen top or color of the cabinet; it also gives material and cost estimation. That way you will know how much your dream kitchen will cost you. There is no free version; you have to buy the software to use it.

o If you are more serious about your kitchen remodeling software and have technical background from architecture or engineering, then you may go for software that incorporates designing aspect with the technical aspect of remodeling. In this scenario, Google SketchUp 7.1 Pro is good choice. With this paid software, you can work with AutoCAD and other engineering design software. There is a free version as well but these advanced features are not there.

How To Get The Correct Kitchen Remodeling Software

If you are thinking about remodeling your kitchen and want to see your ideas in some kind of shape, then use one of the many kitchen remodeling software available in the market.

I recently bought a 2,000 square foot foreclosed two-story with pool vacation home in the city of San Jacinto, California. For all practical purposes, the house is perfect. One feature that is not a sight for sore eyes however, is the flooring. The kitchen floor was covered with a mobile home appeal linoleum floor. The family room was masked with a non-matching floating laminate wood that resembles a bowling alley. For the rest of the house it was adorned with balding stained carpet.

In the beginning, I contemplated of doing the project myself. However, with the lack of time and real skill to create impressive results, I quickly decided to have a professional perform the work. With a new city and not knowing anyone, I hit the classified ads to look for a contractor. I wanted the first story and all the bathrooms to have lasting porcelain tiles. The second story and stairs I chose to use engineered wood floor.

The first person who quoted, provided the cheapest labor cost for $3,500. He was well spoken, provided work reference and seemed knowledgeable about the job. The problem was, his driver’s license is out of state, he didn’t have a contractor’s license and liability insurance, and the phone he uses belongs to his girlfriend. As much as I like the price, I pictured a working relationship with an unreliable teenager.

Next person had a tile license and is bonded. He quoted the highest labor for $4,550 but it was only for the tile part. He does not do any other type of flooring. Since I didn’t want to deal with two people I knew he was out. However, I discovered from him to make sure to pull the vinyl floor and not tile on top of it. I also learned to use a water proofing paper underneath the tiles for the bathroom floors.

The third one who got the job had all the right paperwork and had a business address. His labor cost came to $5,250. Putting wood floor on the stairs was $450 more as oppose to just recarpeting. He had porcelain tiles that I liked for $2 a sq. ft., which included thinset and grout. None of the wood floor he had appealed to me and I did my own research. After finding one, I bought the wood floor and used his contractor’s license for further discount. Tiled floor came to 1,000 sq. ft. and the wood floor came to 600 sq ft. Total cost for the project including painted baseboard installed, $9,750.

One of the biggest complaints I hear about when I renovate a home is how the last contractor did such a poor job on the drywall that you could see all of the seams within a few months. This should not be. Drywall finishing is less of a construction task and more of an art form. The best part about this art form is that anyone can do this properly using a few simple techniques that ensure a perfectly smooth canvas to do whatever you want to to bring it to life.

Taping

Taping the joints of drywall is just as important as the joint compound that is used to fill and cover the joints. The easiest type of tape to use for covering drywall joints is fiberglass mesh tape. While the professionals tend to favor paper tape, Fiberglass tape is much easier to apply and does not require the use of drywall mud to put stick to the drywall.

The adhesive side of the tape simply peels off the roll and the tape is pushed onto the surface of the drywall to cover the gaps evenly on each side and cut off with scissors or a utility knife to the desired length. For inside corners, the fiberglass mesh tape can be applied by pushing the tape into the joint and running your finger down the length of the tape to create a perfect transition from the ceiling to the wall.

Outside Corners

Metal corner bead is the most durable and proven method of finishing corners of drywall. The corner bead should be nailed into place with a minimum of ¼ inch ring shank drywall nails on the edges of the corner bead. Snipping the ends at a 45 degree angle prevents the corner bead from flaring out when joint compound is applied and creates a much more professional look.

Joint Compound

In the case of joint compound, the first rule of thumb is to use a high density joint compound for the first and second coat over the drywall joints and screw holes. Durabond and Blue Rhino make some of the hardest setting joint compounds available with different dry times. Most people want a durabond 90 or 120 which means if it takes 90 minutes from the time the joint compound is mixed to become fully solid. This type of joint compound is workable for about 45 minutes before it cannot be used.

Less is more as a light coat of joint compound will be easy to work with and will require less sanding. This is especially true with the first few coats as sanding the heavier weight joint compounds can be extremely labor intensive.

After the first two coats have been sanded and are almost ready for primer, apply a layer of lightweight joint compound over the top. This is a great filler for any divots or scrape lines that can happen when the trowel runs across the joints. It is also great for a technique called feathering which means applying the joint compound to past the joint several inches to create the illusion of the wall being flat.

Texturing

Texturing the drywall is typically down with a light trowel coating of lightweight joint compound or a spray texture of joint compound and water. This gives the wall some dimension and is typical of most homes build from 1985 to present day.

Drywall work can be performed by anyone. It is not about how fast you finish it, but how good it looks when you are done.

Confessions of a House Cleaner

Confessions of a house cleaner. No, these aren’t my personal confessions, but dirty secrets about what you wouldn’t expect to find inside a person’s house from looking at it from the outside! As a professional house cleaner, I love the hours and flexibility of the job, and the money isn’t too shabby either. I supplement my cleaning job with small gigs like writing for this site. For the most part, I love my cleaning job but there are days I gasp as I walk into someone’s house when it looks like a tornado just blew in from Kansas. I expect to see Dorothy or the wicked witch hiding around the corner in the bathroom!

It use to be that house cleaners were only for the rich and famous. Not these days. Life is hectic and busy, and even with problems in the job market and the cost of rising gas, it seems that the business of house cleaning remains big business. Middle-class people will pay for house cleaning because they don’t have time anymore. Husband and wife both work, add in kids, after-school activities and other gatherings, and they just don’t have time. That’s where I come into the picture. But even having a house cleaner to do their dirty work, it seems that they would at least pick up the house on a daily basis or do some type of general cleaning during the week or weeks I am not there.

Some of the people I clean for are professionals … Lawyers, nurses, people in high-management positions. From the outside they seem to be perfect. They dress well, drive very nice cars and have large homes in upper-class neighborhoods. Looking in from the outside, you would imagine that their homes are spotless. Wrong! I have seen things cleaning houses that make me gasp and then churn my stomach. Filthy bathrooms that haven’t seen cleaning products except for when I show up and use them. Nasty toilets and sinks that would make a person gag, and have made me gag one more than one occasion. After the gagging process is over, I swear. When nobody is home, I swear loudly. I think to myself, “how can people live like this?” “How can these people who seem to have it all, live like the slobs that they are?” sigh…

I understand clutter, believe me I do. I have it myself. But what I cannot understand is how people can live in a home full of filth and disgusting germs! Microwaves that are so dirty it takes a half hour to clean them. Kitchen counters that are littered with crumbs that seem to have been there from the caveman era. Bathroom showers that have the stench of rotting hair and mildew, with the majority of the hair still stuck in the drain as huge clumps that seem to have a life of their own. Trash cans that don’t have bags inside them, and things stuck to the bottom of the can after you empty it, like gum, tissues full of mucus and things that you don’t even want to guess at what they are!

Again, this is my job- to clean houses. But all I ask is that people try to put themselves in my shoes for once and ask themselves if they would want to clean the nasty brown feces that is still stuck around the toilet rim that’s been left for two weeks. Even though it is my job, I do have limits. I have forced myself to have limits. I have even seen pet accidents on carpets which I use to clean. Use to are the key words here. It use to bother me so much that I would do it. I finally got a backbone and said “NO I will not do this anymore, I have limits and self-dignity!” I will not clean a bathroom counter that cannot even be found! I will clean the mirror and sink, but if you have half of the Walmart health & beauty products sitting on it, I won’t touch it. A huge pile of dirty dishes when the dishwasher is full of clean ones? Nope, won’t do them. I am a house cleaner, not a housekeeper. If you want someone to pick up after you, your kids and your pets- go find yourself a maid.

Cheap and Natural Homemade Cleaning Alternatives

In today’s uncertain economic climate, it never hurts to save a little extra cash, so more and more people are looking for cheaper alternatives in pretty much everything; from shopping at a thrift store instead of a department store, to making dog treats instead of buying them – anything and everything can be gotten a little more cheaply if the will is there.

When shopping for a household, some of the more expensive items can be found in the cleaning aisle; from kitchen and bathroom disinfectants, to floor cleaners and window spray, there is a cleaning product for almost every surface in a home, and when adding them up it can get surprisingly costly. But happily, there are alternatives out there that take just a few extra minutes to prepare, and cost a lot less money than the commercial versions – and as a bonus are pretty environmentally friendly too!

Using White Vinegar to Create Natural Cleansers

Vinegar is one of the cheapest and easiest options available. Vinegar is acid based, and as such it can cut through grease, mold, mildew, and almost any dirt and grime the standard busy household can produce. And vinegar is an efficient antibacterial solution and germ killer too!

There are lots of recipes out there for different vinegar-based cleansers. And for the few dollars it costs to buy one large bottle of vinegar that can be mixed and used in almost every area in the house, a person would likely bring home only one small bottle of cleanser that could only be used for one specific task.

Tip: Mixing essential oils in with some vinegar solutions can reduce the pungent smell!

Using Baking Soda as a Cleaning Alternative

Another versatile and inexpensive option for cleaning is baking soda. Baking soda can be mixed with vinegar to create several different types of deep cleaning solutions, but can also be used on its own to remove odor from carpets, or brighten up white laundry – there are plenty of recipes out there! It is especially great for removing set in stains on almost any surface, and can be used on delicate surfaces since it is unlikely to scratch or etch the material.

Using Lemon and Lime Juices as Natural Cleaning Alternatives

Lemon and lime juices are also efficient cleanser alternatives. Because both lemon and lime juices have acids in them, they work well in breaking down grease, lime scale, hard water build-up and other tough household grime. They work similarly to vinegar, and can often be used in place of vinegar in many cleanser recipes. Not only do the juices of these fruits work as cleansers, but unlike vinegar, they leave behind a pleasant scent, and so can be used as deodorizers for rooms and surfaces as well.

Using Hydrogen Peroxide as a Natural Cleanser

Hydrogen peroxide is another natural and cheap alternative to commercial cleaning products. According to using-hydrogen-peroxide.com, it is “antibacterial, anti-fungal, anti-mold and anti-mildew” and so is a great multi-surface cleaner in the kitchen and bathroom, and it “tends to keep your sponges, mops, and scrubbie pads a whole lot cleaner” – helping to extend their lives and save you even more money in the long run!

Tip: When using any of these natural solutions, it is always a good idea to test a small hidden area of the surface to be cleaned, just to be sure that no unforeseen damage is done!

All of these natural options can save a bundle of money for any household, and all it takes is a little extra time mixing the solutions – many of which can be made in large amounts and stored for later use – time equal to that spent at the store shopping for the commercial versions anyway!

And not only are all of these options cost effective, but any household can easily reduce its environmental impact by using them on a regular basis, since they are completely natural and non-toxic; a person can be doing the cleaning and doing their part for the environment at the same time. Don’t be afraid to give some of these cheaper homemade options a try, since they often do as good a job or better than store-bought products!